Digital Time and Date

Welcome Note

Wednesday, December 26, 2012

அவசியமான சில கணினி டிப்ஸ்(Computer Tips)

நாம் அன்றாடம் கணினியில் செய்யும் செயலுக்கான  டிப்ஸ். இது கணினிக்கு புதியவர் மற்றும் மாணவர்களுக்கு பயனுள்ளதாக இருக்கும் என  நினைக்கின்றேன்.

01 FOLDER  TO  FOLDER  காப்பி,பேஸ்ட் செய்ய எளிய வழி
நாம் அடிக்கடி பைல்களை (File) ஒரு folder-ல் இருந்து  மற்றொரு folder -க்கு மாற்றும் செய்வோம் அல்லது ஒரு புரோகிராமிலிருந்து  (Program)  மற்றொரு புரோகிராமுக்கு மாற்றம் செய்வோம் இது இயல்பு .அவ்வாறு செய்ய பொதுவாக நாம்  Alt +Tab   கீகளை பயன்படுத்தி ஒரு folder -இல்  இருந்து மற்றொரு folder -க்கு Copy & Paste செய்து மாற்றம் செய்வோம் இது நமக்கு அலுப்பை தரலாம்.இதற்கு மாற்று வழி ஒன்றுள்ளது.முதலில் நீங்கள் அதற்கு ஏற்றவாறு  உங்களுடைய விண்டோவினை மாற்றிக்கொள்ளவேண்டும்.

நீங்கள் எந்த விண்டோக்களில் மாற்றம் செய்ய வேண்டுமோ அவற்றை தவிர மற்றவற்றை மினிமைஸ் செய்துகொள்ளவேண்டும்.
 
பின்பு டூல்பாரில் காலி இடத்தில் ரைட் கிளிக் செய்து கிடைக்கும்மெனுவில் " Tile  Windows Vertically  " அல்லது  " Tile  Windows Horizontally  " இவற்றில் ஒன்றினை தேர்வு செய்தாள். தேர்ந்தெடுத்த விண்டோக்கள் இரண்டும்  ஒன்றுடன் ஒன்று ஒட்டியவாறு நமக்கு கிடைக்கும்.இதன் பின்பு Copy & Paste  செய்ய ஏதுவாக எளிமையாக இருக்கும்,


02.ஒரு போல்டரை போல் அணைத்து  போல்டரையும்  மாற்ற

விண்டோஸ் இயக்க டைரக்டரியில்  ஒரு போல்டரினைக் குறிப்பிட்ட வகையில் அமைகின்றோம்.அதனை போலவே அணைத்து போல்டரையும் மாற்ற விரும்பலாம் அதனை எவ்வாறு செய்வது என்பதினை நாம் இங்கு காணலாம்.சில ஆப்பரேட்டிங் சிஸ்டம்,பைல்களை மற்றும் போல்டர்களைக் காட்டுவதற்கு என்று டிபால்ட்டாக (default) சிலவற்றை அமைத்துள்ளது.அவை Thumbnails,Tiles,List,Icons  & Display with Details என சில உள்ளன.இவை எந்த போல்டரை மாற்றுகிறோமோ அது மட்டும் தான் மாறும்,மற்றவை மாறாது.

நமக்கு அணைத்து போல்டர்களும் ஒரே மாதிரியாக மாற வேண்டுமெனில்  சில மாற்றங்களை செய்ய வேண்டும்.அது எவ்வாறு என பார்ப்போம்.

முதலில் ஏதேனும் ஒரு டிரைவில்   போல்டர்  அதிகம்  உள்ள  பகுதியினை  திறக்கவும். அதில் காலி இடத்தில மௌசினை வைத்து ரைட் கிளிக் செய்து View என்பதில் கிளிக் செய்திடவும்.அதில் உங்களுக்கு பிடித்த வியூவினைத்  தேர்ந்தெடுக்கவும். பின்பு தேர்ந்தெடுத்த போல்டரில்  கீழ்   வருமாறு  செல்லவும்.


Tools -> Folder Option டயலாக் பாக்ஸ் திறக்கவும்.

படம் 2

இந்த  Folder Option டயலாக் பாக்ஸில் View டேப்பினை தேர்ந்தெடுக்கவும். இந்த டயலாக் பாக்சின் மேலுள்ள உள்ள Apply to all folders (படத்தில் சிகப்பு கட்டத்தில் காட்டி உள்ளதை) என்பதை தேர்ந்தெடுக்கவும்  இந்த் மாற்றத்தினை உறுதி செய்ய "Set all the folders on your computer to match the current folders view settings (except for toolbars and foder task)? Change will occur the next time you open them"  என்ற மெசேஜை  காட்டும் .OK-வினை கிளிக் செய்து வெளியேறவும். 
இப்போது நீங்கள் எந்த வியுவினை தேர்வு செய்தீர்களோ,அந்த View-இல் அனைத்து  போல்டர்களும் மாறியிருக்கும். இதன் பின்பும் நீங்கள் குறிப்பிட்ட போல்டரை உங்கள் விருபதிற்கு ஏற்றவாறு மாற்றிகொள்ளலாம்.


03. பைல்கள் (files) மற்றும் போல்டர்களை (Folders) மறைத்துவைக்க

நமக்கு தேவையான முக்கிய தகவல்களை யாரும் பார்க்காதப்  படியும்
அழிக்காத படியும் எந்த ஒரு மென்பொருளின் துணையுமின்றி மறைத்து வைக்க. கீழ்வருமாறு செய்து மறைத்து வைக்கலாம்.மறைத்து  வைக்கவேண்டிய போல்டர் அல்லது பைல்களை தேர்ந்தெடுத்துக்கொண்டு மௌஸில் ரைட் கிளிக் செய்து அதில் வரும் Hidden  என்பதிற்கு முன்னுள்ள கட்டத்தில் டிக் செய்து பின்பு Apply & Ok செய்து வெளியேறவேண்டும்.
படம் 1,2-இல் உள்ளவாறு செய்யவும்.
படம் 1
படம் 2
இவ்வாறு செய்த பின்பு அந்த போல்டரில் உள்ள Tools மெனு சென்று அதில்  Folder Option  சென்று அதில் View மெனுவினை செலக்ட் செய்தால் அதில் "Hidden  Files & Folders " என்ற போல்டரில் "Do not show Hidden Files & Folders" என்பதிற்கு முன்னாள் உள்ள கட்டத்தை 'டிக்' செய்துகொண்டு  Apply  Ok தந்து வெளியேற வேண்டும் .(Tools ->Folder Option -> View ->Hidden Files & Folders)
படம் 3
இப்போது நீங்கள் தேர்ந்தெடுத்த File  & Folder  மறைந்திருக்கும்.மீண்டும் இவை வேண்டுமெனில் மறைக்கப்பட்ட இடத்திற்கு சென்று மேலே சொன்ன கட்டத்தில் உள்ள 'டிக்' மர்க்கினை நீக்கி விட்டு, "Show Hidden Files & Folders" என்ற இடத்தில் உள்ள வட்டத்தில் 'டிக்'' மர்க்கினை  செய்யவேண்டும்   மீண்டும் மறைந்தவை தெரியும்.
பதிவு பிடித்திருந்தால் உங்களுடைய பொன்னான ஓட்டினை பதிவு செய்யவும்.
நன்றியுடன்
அறிவு கடல் 

கணினிக்கான சில எளிய வழி செயல்கள்

கணினிக்கான சில எளிய வழி செயல்கள்

01 சரியாகத் திரையைப் படிக்கமுடியவில்லையா?
     தட்டச்சு பலகையில் இடது பக்கம் உள்ள ஷிப்ட் + இடது  ஆல+
     பிரிண்ட் ஸ்க்ரீன் [Left Shift+Left Alt+PrtScreen] ஒருசேர அழுத்துங்கள் கீழ்  
     உள்ளது போல் ஒரு  பெட்டி வரும்.அதில் OK பட்டனை அழுத்தினால்
     திரையின் Contrast மாறும்.


    அதில் நமக்கு விருப்பமானதை தேர்வு செய்து கொள்ளலாம் .இது கண்   
    பார்வைக்  குறைவாக உள்ளவர்களுக்கு உதவும்.


02.கணினியை 5 வினாடிகளில் ஷட் டவுண் செய்ய 

இது WIN XP பயன்படுத்துபவர்களுக்கு மட்டும்.கணினியை பயன்படுத்திவிட்டு விரைவாக அணைக்க வேண்டும் எனில் டெஸ்க்டாப்பில் உள்ள காலி இடத்தில மவுஸ் கொண்டு ரைட் கிளிக் செய்திடவும்.அதில் வரும் மெனுவில் New/Shortcut என்பதை கிளிக் செய்யவும்.அதில் ஷட்டவுண்(shutdown) என டைப் செய்து பின்பு ஒரு ஸ்பேஸ் விட்டு கீழ்வருவதை போல் டைப் செய்யவேண்டும்
c:\windows\system32\shutdown.exest05 


படத்தில் உள்ளது போல் செய்து Next பட்டனை அழுத்திய உடன் ,கணினி 05 வினாடிகலில் மூடப்படும் என  ஒரு செய்தி வரும்.இதனை நேரம் கூடுதலாகவும் வைத்து மாற்றிக்கொள்ளலாம்.

இதன் பின் NEXT என்பதை கிளிக் செய்து பின்னர் வரும் கட்டத்தில் உங்களுக்கு புரியும் வகையில் ஒரு பெயரைக் கொடுக்கவும்..அதன் பின்பு FINISH என்பதை கிளிக் செய்து வெளியேறவும் .

நீங்கள் செய்ததெல்லாம் Shutdown.exe என்ற பைலை உங்களுக்கு ஏற்றப்படி இயக்க வழிசெய்ததுதான்.இந்த பைல் %systemroot%\system32  என்ற இடத்தில இருக்கிறது.


03.இன்டர்நெட்டில் லிங்குகள் புதிய டேப்பில் திறக்க


இன்டர்நெட் எக்ஸ்புளோரரில் Tools Menu சென்று Internet option என்னும் பிரிவினை தேர்ந்தெடுக்கவும்.கிடைக்கும் விண்டோவில் Advance Tab செல்லவும்.இதில் உள்ள பிரவுசிங் செக்க்ஷனில் Reuse windoe for launching shorcuts என்று தரப்பட்ட இடத்தில் உள்ள டிக் அடையாளத்தை எடுத்துவிடவும்.

நீங்கள் பயர்பாக்ஸ் பயன்படுத்துபவராக இருந்தால் Tools Option  செல்லவும்.அதன் பின் "Advanced"  என்ற பட்டனைக் கிளிக் செய்க.. கிடைக்கும் விண்டோவில் Tabbed Browsing என்ற ஒரு பிரிவு காணாப்படும்.அதில் நீங்கள் எப்படி விரும்புகிறீர்களோ அதற்கேற்றர் போல் தேர்ந்தெடுத்து  OK கொடுத்து வெளியேறவும்.

இனி லிங்க் கிளிக் செய்தால் புதிய விண்டோவில் மட்டுமே கிடைக்கும் .


04.அவுட்லுக் எக்ஸ்பிரஸில் காணாமல் போன பட்டனை மீண்டும்  கொண்டுவருவது எப்படி?

சில நேரங்களில் நாம் அவசரமாக செயல்படும் போது தவறுதலாக சிலவற்றை அழித்துவிடுவோம்.அவ்வாறாக CreateMail, Reply, Forward, Send/Received, Delete போன்ற பட்டன்களை மறைந்து போக செய்து விடுவோம்.

அதனை மீண்டும் அங்கு கொண்டு வர அந்த பட்டன்கள் வழக்கமாக எங்கு அமருமோ அந்த இடத்தில் காலியாக கிரேயாக உள்ள இடத்தில ரைட் கிளிக் செய்திடுங்கள் கிடைக்கும் மெனுவில் Customize என்பதை தேர்ந்தெடுங்கள்.Current Toolbars என்று காட்டப்படும் பெட்டியில் Reset என்னும் பட்டனில் கிளிக் செய்திடவும்.செய்த பின்பு பார்த்தால் அனைத்தும் மீண்டும் அதே இருப்பதை காணலாம்.

05.DLL File அழிந்துவிட்டால் எங்கு கிடைக்கும்
பல நேரங்களில் Software புரோகிராம்கள் இயங்காமல் நின்று விடும்.அப்போது காரணம் என்னவென்று பார்த்தல் குறிப்பிட்ட டி.எல்.எல் பைல் இல்லை (Could not find ***dll") என செய்திவரும் அல்லது கெட்டுவிட்டது என்று செய்தி வரும்.

சரி அந்த 'dll 'file க்கு எங்கே செல்வது.அந்த சாப்ட்வேர் தொகுப்பின் ஒரிஜினல் CD-ஐ எடுத்து தேடினால் குறிப்பிட்ட பைல் எளிதில் கிடைக்காது.இதற்கு இணையம் ஒரு வழியினை தருகிறது.

www.dllfiles.com என்ற தளத்திற்கு செல்லுங்கள்.அதில் உள்ள தேடும் கட்டத்தில் search box-ல் உங்களுக்கு தேவையான டி.எல்.எல் பைலின் பெயரினை டைப் செய்யவும்.அந்த பைல் சம்பந்தமானவை  என்ற
செய்தி வரும் .


பின் அதில் உள்ள டவுண் லோட் பிரிவிற்கு சென்று நமக்கு தேவையான
 பைலினை தரவிறக்கி  கொள்ளலாம் .  இது போன்ற டி.எல் .எல் பைல்கள்  எல்லாம்  அனைத்து Software தொகுப்புகளும் பயன்படுத்தும் வகையில் பொதுவானதாக உள்ளதால் இவை இந்த தளத்தில் கிடைக்கின்றது. இந்த தளம் இது போன்ற பைல்கள்  கிடைத்திட  மிகவும் பயனுள்ளதாக உள்ளது.


நன்றியுடன்

அறிவு கடல்

மருந்துகளின் சரியான விலையினை அறிய

நமது ஒவ்வொருவரின் வீட்டிலும் குடும்பத்தினை நடத்துவதற்கான போதுமான அளவு நிதிநிலை இல்லாத நிலையிலும், மருத்துவ செலவிற்கென தனியாக நிதியினை ஒதிக்கிவைப்போம். அனைத்து வகை மக்களிடமும் மருத்துவத்திற்கான செலவுகள் மட்டும் மிகவும் அவசியமான செலவினமாக  உள்ளது. இதனை நிச்சயம் ஒதுக்கிவிடமுடியாத ஒன்றாக இருக்கும். அதிலும் மருத்துவர் தரும் மருந்துகளின் விலை நமது இரத்த அழுத்தத்தை உயர்த்திவிடும்.

நமது மருத்துவர்கள் நமக்கு பரிந்துரைக்கும் மருந்துகளின் குறியீட்டு பெயர்களை (BRAND NAME) மட்டும்தான் குறிப்பிடுகிறார். ஆனால் அதன் இனப்பெயரினை (GENERIC) என்னும்  வேதிபெயரினை கொண்டு குறிப்பிடுவதில்லை. அதன் காரணமாக நமக்கு வழங்கப்படும் மருந்துகளின் மாற்று பிராண்ட் உள்ளதா இல்லையா என்பதினை அறிய முடிவதில்லை மற்றும் அதன் விலையினை ஒப்பிட்டு பார்க்கவும் முடிவதில்லை. ஒரே வகையான மருந்துகள் ஒரே விகிதாச்சார கலவை மற்றும் அதே நோய்க்காக தரப்பட்டிருக்கும். ஆனால் இதனை நாம் அறியமுடிவத்தில்லை. இதனால் நமது பணம் விரயத்தை தவிர்க்கவும்  முடியவில்லை. 
இதனை அறிவதற்கென ஒரு தளம் உள்ளது இதனை எனது முகநூல் நண்பர் மூலம் அறிந்துக்கொண்டேன். இவை அனைவருக்கும் பயன்படும் என இங்கு பதிவிடுகிறேன். இதன் மூலம் மருந்துகளை ஒப்பிட்டு பார்த்து வாங்கி பணத்தினை மிச்சப்படுத்தலாம்.
இத்தளத்தின் முகவரி : http://www.medguideindia.com
மேலே உள்ள படத்தில் உள்ளது போல் ஒரு திரை தோன்றும். அதில் கீழ்வருமாறு செயல்களை மேற்கொள்ளவும்.

 Click on ' Drugs ' 


01.Click on 'Brand'

பின்பு  2-என வட்டமிட்டு கட்டியுள்ள பகுதியில் நமது மருந்தின் பெயரினை தரவேண்டும். பின்பு search என தரும் போது நாம் குறிப்பிட்ட மருந்தின் விவரம் திரையில் தோன்றும். 
பின்பு 3-ல் குறிப்பிட்ட பெட்டியில் உள்ள Active Ingredients/Matched Brands என்பதினை அழுத்தினால் நாம் குறிப்பிட்ட மருந்தின் Generic Name தெரியவரும்.
அதில் Constituents என்பதின் கீழே உள்ளதுதான் மருந்தின் Generic Name ஆகும்.
Click on 'Generic' 
தோன்றும் திரையில் Generic Name என்ற பகுதியில் நாம் மேலே தெரிந்து கொண்ட  Generic Name-னை தந்து Search என்பதினை கிளிக் செய்து தோன்றும் திரையில் உள்ள Matched Brands with Single Generic அல்லது Matched Brands with Combination of Generic(s) என்பதின் கீழே உள்ளதை அழுத்தும் போது நாம் குறிப்பிட்ட மருந்தின் ஒத்த வேறு மருந்துகளும் அதன் விலையும் காட்டப்படும்.  

இதன் மூலம் ஒத்த பார்மூலா உள்ள  பலதரப்பட்ட நிறுவன மருந்துகளை ஒப்பிட்டு பெறலாம். மேலும் இதில் அந்த நிறுவன மருந்துகளின் முழுவிவரங்களையும் இந்த தளத்தின் மூலம் அறியலாம். ஒருமுறை சென்று பாருங்கள் மற்ற விவரங்களை முழுதும் அறிந்துகொள்ளலாம். 
எப்பொழுதும் மருந்துகளை மருத்துவரின் ஆலோசனையின் மூலமே எடுத்துகொள்வது மிகவும் சிறந்தது.

நன்றியுடன் 
அறிவு கடல்

ஜிமெயில் ஷார்ட்கட் கீகள் (GMAIL SHORTCUT KEYS)

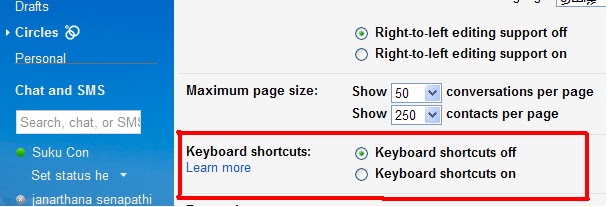
நமது அன்றாடம் பயன்படுத்தும் ஜிமெயில் கணக்கில் ஷார்ட்கட் கீகளை கொண்டு பயன்படுத்த வேண்டுமாயின்  முதலில் அதன்  Setting-இல் சில மாற்றம் செய்து       கீபோர்ட் ஷார்ட்கட்ஸ்  (KEYBOARD SHORTCUTS) என்பதை 'ON' செய்யவேண்டும்.அது எவ்வாறு செய்வது என பார்ப்போம்.

முதலில் உங்களது கணக்கினை திறந்துக்கொண்டு பின்பு கீழே படத்தில் உள்ளது போன்று   1 -  Gear Icon -ஐ click செய்து திறக்கும் பெட்டியில்                                                        2    SETTING -இல் நுழையவேண்டும்.
படம் 1

இவ்வாறு  திறந்த பின்பு அதில் வரும் option -களில் படம் 2 உள்ளது போல் Keyboard Shortcut  On என்ற வட்டத்தினுள் டிக் செய்யவேண்டும்.

படம் 2

இப்பொழுது Keyboard Shortcut  On -கி இருக்கும். இப்பொழுது நாம் shortcut -னை keyboard மூலம் பயன்படுத்தலாம்.
கீழே குறிபிட்டுள்ள கீகளை பயன்படுத்தி மௌசின் துணையின்றி நாம் தட்டச்சு பலகையிலே ஜி மெயிலினை இயக்கலாம்.
<><><><><><><><><><><><>
Shortcut KeyDefinitionAction
    c ComposeAllows you to compose a new message. <Shift> + c allows you to compose a message in a new window.
    /  SearchPuts your cursor in the search box.
    k Move to newer conversationOpens or moves your cursor to a more recent conversation. You can hit <Enter> to expand a conversation.
    j Move to older conversationOpens or moves your cursor to the next oldest conversation. You can hit <Enter> to expand a conversation.
    n Next messageMoves your cursor to the next message. You can hit <Enter> to expand or collapse a message. (Only applicable in 'Conversation View.')
    p Previous messageMoves your cursor to the previous message. You can hit <Enter> to expand or collapse a message. (Only applicable in 'Conversation View.')
   o or       <Enter> OpenOpens your conversation. Also expands or collapses a message if you are in 'Conversation View.'
    u Return to conversation listRefreshes your page and returns you to the inbox, or list of conversations.
    e ArchiveArchive your conversation from any view.
    m MuteArchives the conversation, and all future messages skip the Inbox unless sent or cc'd directly to you. Learn more.
    x Select conversationAutomatically checks and selects a conversation so that you can archive, apply a label, or choose an action from the drop-down menu to apply to that conversation.
    s Star a message or conversationAdds or removes a star to a message or conversation. Stars allow you to give a message or conversation a special status.
    + Mark as importantHelps Gmail learn what's important to you by marking misclassified messages. (Specific to Priority Inbox)
    - Mark as unimportantHelps Gmail learn what's not important to you by marking misclassified messages. (Specific to Priority Inbox)
    ! Report spamMarks a message as spam and removes it from your conversation list.
    r ReplyReplies to the message sender. <Shift> + r allows you to reply to a message in a new window. (Only applicable in 'Conversation View.')
    a Reply allReplies to all message recipients. <Shift> +a allows you to reply to all message recipients in a new window. (Only applicable in 'Conversation View.')
    f ForwardForwards a message. <Shift> + f allows you to forward a message in a new window. (Only applicable in 'Conversation View.')
  <Esc> Escape from input fieldRemoves the cursor from your current input field.
<Ctrl> + s Save draftSaves the current text as a draft when composing a message. Hold the <Ctrl> key while pressing s and make sure your cursor is in one of the text fields -- either the composition pane, or any of the To, CC, BCC, or Subject fields -- when using this shortcut.
    #  DeleteMoves the conversation to Trash.
    l  LabelOpens the Labels menu to label a conversation.
    v  Move toMoves the conversation from the inbox to a different label, Spam or Trash.
<Shift> +   i Mark as readMarks your message as 'read' and skip to the next message.
<Shift> +   u Mark as unreadMarks your message as 'unread' so you can go back to it later.
    [ Archive and previousRemoves the current view's label from your conversation and moves to the previous one.
    ] Archive and nextRemoves the current view's label from your conversation and moves to the next one.
    z UndoUndoes your previous action, if possible (works for actions with an 'undo' link).
<Shift>      +   n Update current conversationUpdates your current conversation when there are new messages.
    q Move cursor to chat searchMoves your cursor directly to the chat search box.
     y Remove from Current View*Automatically removes the message or conversation from your current view.

From 'Inbox,' 'y' means Archive
From 'Starred,' 'y' means Unstar
From 'Trash,' 'y' means Move to inbox
From any label, 'y' means Remove the label

* 'y' has no effect if you're in 'Spam,' 'Sent,' or 'All Mail.'
      . Show more actionsDisplays the 'More Actions' drop-down menu.
<Ctrl> + <Down arrow> Opens options in Chat<Ctrl> + <Down arrow> moves from edit field in your chat window to select the 'Video and more' menu
Next, press <Tab> to select the emoticon menu
Press <Enter> to open the selected menu

     ? Show keyboard shortcuts helpDisplays the keyboard shortcuts help menu within any page you're on. (Note: Typing ? will display the help menu even if you don't have keyboard shortcuts enabled)


     k Move up a contactMoves your cursor up in your contact list
     j Move down a contactMoves your cursor down in your contact list
o or <Enter> OpenOpens the contact with the cursor next to it.
     u Return to contact list viewRefreshes your page and returns you to the contact list.
     eRemove from Current GroupRemoves selected contacts from the group currently being displayed.
     x Select contactChecks and selects a contact so that you can change group membership or choose an action from the drop-down menu to apply to the contact.
  <Esc> Escape from input fieldRemoves the cursor from the current input
      # DeleteDeletes a contact permanently
      l Group membershipOpens the groups button to group contacts
      z UndoReverses your previous action, if possible (works for actions with an 'undo' link)

Combo-keys - Use the following combinations of keys to navigate through Gmail.

Shortcut KeyDefinitionAction
<Tab> then <Enter> Send messageAfter composing your message, use this combination to send it automatically. (Supported in Internet Explorer and Firefox, on Windows.)
y then o Archive and nextArchives your conversation and moves to the next one.
g then a Go to 'All Mail'Takes you to 'All Mail,' the storage site for all mail you've ever sent or received (and have not deleted).
g then s Go to 'Starred'Takes you to all conversations you have starred.
g then c Go to 'Contacts'Takes you to your Contacts list.
g then d Go to 'Drafts'Takes you to all drafts you have saved.
g then l Go to 'Label'Takes you to the search box with the "label:" operator filled in for you.
g then i Go to 'Inbox'Returns you to the inbox.
g then t Go to 'Sent Mail'Takes you to all mail you've sent.
* then a Select allSelects all mail.
* then n Select noneDeselects all mail.
* then r Select readSelects all mail you've read.
* then u Select unreadSelects all unread mail.
* then s Select starredSelects all starred mail.
* then t Select unstarredSelects all unstarred mail.

எனவே மேற்கூறிய ஷார்ட்கட் கீகளை பயன்படுத்தி ஜி மெய்லை விரைவாக 
பயன்படுத்திக்  கொள்ளலாம்.  
இப்பதிவு இதனை பற்றி தெரியாதவர்களுக்கு மிகவும் பயனுள்ளதாக இருக்கும் என்பதில் எந்த சந்தேகமுமில்லை.


என்றும் நன்றியுடன்
அறிவு கடல்